Grandma, actually refers to Kristie's Grandma. She gave me the recipe and I loved it so much I had to get it on here before I lost it! I served this stuffing at Thanksgiving and no one could tell it was gluten and dairy free. The ingredients and cooking methods aren't exact, as no Grandma ever is, so use it as a guide.
Ingredients
1 batch of Stuffing Bread Mix
1 1/2 cups celery and onion (ratio to your taste)
1 stick + Earth Balance
1 1/2 - 2 cups pork sausage (I used 2)
3 cups + chicken stock or stock made from the turkey neck
Directions
Melt about a tablespoon Earth Balance in a medium saute pan. Add the celery, onions, and a little water to the pan. Saute until the vegetables are al dente. Set aside, including the extra liquid.
Cook the pork sausage until brown. Set aside and save the drippings.
In a large bowl, combine the bread mix, vegetables, sausage, reserved water and drippings.
In a small bowl, beat 2 eggs. Add 1 sick melted Earth Balance and 1/4 cup water. Mix well and pour over the stuffing mixture. Stir to coat. Continue to add additional stock, 1 cup at time until stuffing mix is moist but not sopping.
This recipe can be cooked in the oven at 350 for 35-40 minutes or done in the crock pot. I did mine in the crock pot on low and it cooked for about 5 hours. It was done well before that but lasted nicely in there and gave me extra oven space. Every hour or so I checked on it and if it looked dried out, I added additional stock.
Friday, December 23, 2011
Sunday, December 18, 2011
Kix & [DF] Cheese

This recipe has been in my family for years and has always been one of my favorites. I was really excited when I adapted it to make it dairy free and it still tasted great! I usually make a quadruple batch to use the whole box of Kix and bag of Fritos. This batch I made using onion powder and it turned out really well. I think the other optional ingredients would be good too, depending on your mood.
Ingredients
1/4 cup Earth Balance
1/3 cup Vegan Parma!
5 cups Kix or 3 cups Kix and 2 cups corn chips1 teaspoon Worcestershire sauce
1/2 tsp onion powder, onion salt or salt (optional)
1/2 - 1 tsp chili powder (optional)
Directions
Preheat oven to 350 degrees.
Put the Kix and/or corn chips in a large bowl.
In a small sauce pan, melt the Earth Balance. Remove from heat and add quickly the Parma, worcestershire, and any of the optional ingredients. Pour over the Kix mixture and stir until all the Kix are coated. Put the coated Kix into a roasting pan. (For a quadruple batch I use 2 roasting pans) Bake until Kix are brown and dried out, stirring every 15 minutes. This last batch took 45 minutes but it will vary depending on the depth of your pan.
Pour onto wax paper and spread out until cooled.
Wednesday, November 16, 2011
Saffron Risotto with Butternut Squash
We are smack in the middle of the season that makes the ingredients in this 5-star dish shine. This risotto is inherently creamy before the parmesan is even added. It is a recipe originally from Ina Garten, but I modified it to make it Dairy Free.
Ingredients
1 Butternut Squash (about 2 lbs.)
2 Tablespoons Olive Oil
Kosher Salt and Freshly Ground Pepper
6 cups chicken stock
6 tablespoons (3/4 stick) Earth Balance
2 ounces pancetta, diced (4 slices of crumbled bacon is tasty as well)
1/2 cup minced shallots (2 large)
1 1/2 cups Arborio Rice (about 10 ounces)
1/2 cup dry white wine
1/2 teaspoon saffron threads
1 cup freshly grated Parmesan cheese (offered on the side for your non dairy free guests)
Directions
Preheat the oven to 400 degrees.
Peel the butternut squash, remove the seeds, and cut it into 3/4-inch cubes. You should have about 6 cups. Place the squash on a sheet pan and toss it with the olive oil, 1 teaspoon salt, and 1/2 teaspoon pepper. Roast for 25 to 30 minutes, tossing once, until very tender. Set aside.
Meanwhile, heat the chicken stock in a small covered saucepan. Leave it on low heating to simmer.
In a heavy-bottomed pot or Dutch oven, melt the butter and sauté the pancetta and shallots on medium-low heat for 10 minutes, until the shallots are translucent but not browned. Add the rice and stir to coat the grains with butter. Add the wine and cook for 2 minutes. Add 2 full ladles of stock to the rice plus the saffron, 1 teaspoon salt, and 1/2 teaspoon pepper. Stir, and simmer until the stock is absorbed, 5 to 10 minutes. Continue to add the stock, 2 ladles at a time, stirring every few minutes. Each time, cook until the mixture seems a little dry, then add more stock. Continue until the rice is cooked through, but still al dente, about 30 minutes total.
Off the heat add the roasted squash cubes and mix well. I served this along side of a bowl of parmesan cheese. This allowed the non dairy free guests to add a bit of cheese if they wanted, more importantly it kept the dish dairy free so that any leftovers would be safe for me to devour the next day!
Sunday, November 6, 2011
Tex-Mex Tortilla Soup

I got this recipe from a coworker many years ago and instantly became a favorite. I adapted many of the quantities but there wasn't much to adapt to make it gluten and dairy free. It's a vegetarian soup but would also be good with some shredded chicken added, just add more broth to compensate.
Ingredients
6 corn tortillas; slice into 1/2 inch strips
avocado, cubed
DF sharp cheddar cheese
chopped cliantro
lime wedges, to garnish
1 tablespoon canola oil
1 teaspoon ground cumin
1 cup chopped onion
1 1/2 cups chopped celery
1 green pepper
4 cups low sodium chicken broth
2 cups low sodium beef broth
1 can black beans
1 can chopped tomatoes with green chilies (I always buy the hot for some added flavor)
1 cup corn kernels
Directions
Preheat the oven to 350 degrees. Place the tortilla strips on a baking sheet and bake until crispy, about 10 minutes.
In a medium saute pan, heat the oil. Add the onion, celery, green pepper and cumin. Saute over medium high heat until vegetables are tender and fragrant, about 5 minues. Meanwhile, put the broth, black beans, tomatoes, and corn in a stock pot. Add the vegetables once they are cooked. Once the soup is hot it's ready to serve.
Ladle the soup into a bowl. Sprinkle the cheese, cilantro, avocado and tortilla strips on top. Garnish with a lime wedge and serve.
Thursday, October 20, 2011
Apple Bread Pudding
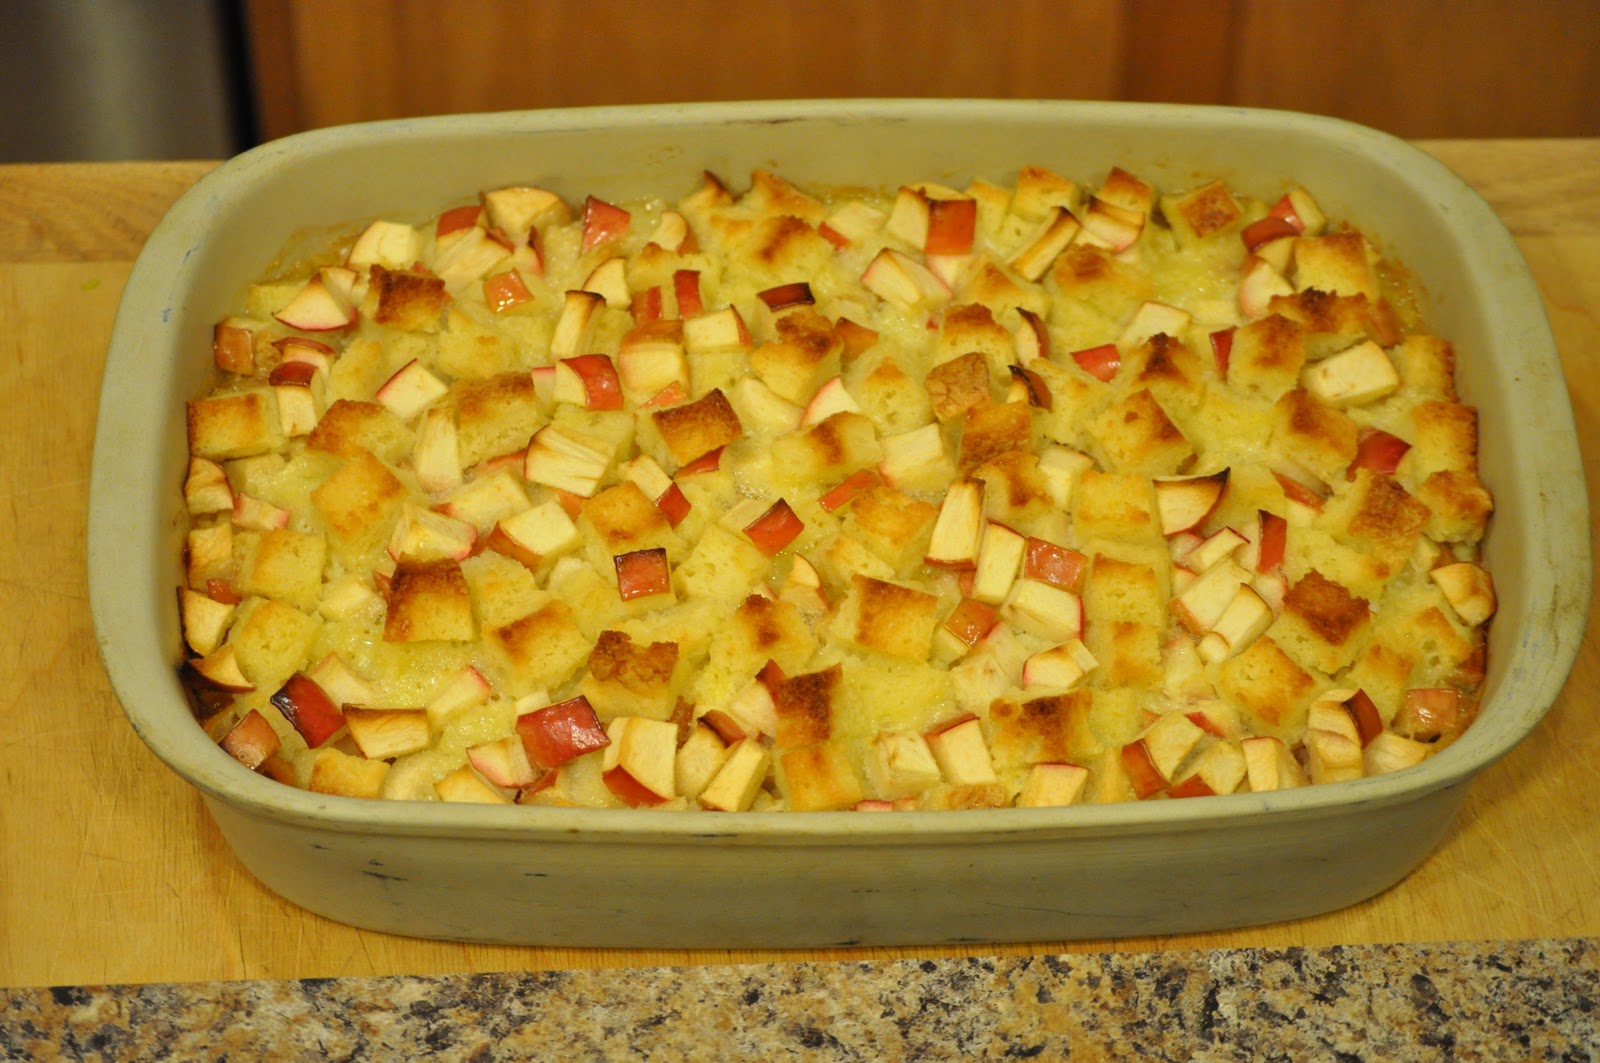
This recipe has been in my family and passed down for many generations. I adapted it to be gluten and diary free. For the bread, I usually make my own loaf of french bread in the bread-maker. Be careful not to add too much bread or it will get too dry. It's served best with your favorite dairy free cream or ice cream.
Ingredients
6 eggs beaten well
2 cups almond milk
2 cups sugar2 tsp vanilla
5-6 large apples
1/4 cup Earth Balance cut into small pieces
6 slices GF white bread
Directions
Preheat oven to 350 degree.
Wisk together the eggs, milk, vanilla, and sugar. Stir in the apples, bread, and Earth Balance until everything is wet. Pour into a 9X13 baking dish. Bake for 1 hour 15 minuets to 1 hour and 30 minutes, depending on how crispy you want it.
Tuesday, October 11, 2011
Chicken Chili
I have been waiting for the weather to cool down before I dive into fall recipes but today, with the weather soaring towards 80, I decided to for-go waiting for fall and cook like it was 60 and gloomy outside. I researched a lot of different chicken chili recipes before I pulled stuff out of my pantry and sat down and wrote out a grocery list. When it came down to it, I made up the recipe as I went, tasting and changing as I went along. The final product was delicious!
Ingredients
1 lb. of cooked and shredded chicken. I used chicken thighs because I found a great deal at the grocery store. Chicken breasts, cooked and shredded would work great as well.
2 15 oz. cans of cannellini beans, drained
1 12 ounce jar of salsa Verde
1 small can of diced chilies
1 15 oz. can of diced tomatoes, drained
2 cups chicken broth
1 teaspoon cumin
1 teaspoon chili powder
2 tablespoons cornstarch, stirred and dissolved in one cup of water
Salt and pepper to taste
Fritos or tortilla chips for garnish
Directions
This is where it gets complicated. Take all of the above ingredients, except the cornstarch mixture, and add it to a crockpot and let it simmer for 4 hours, allowing the flavors to blend. Thirty minutes before serving, add the cornstarch and water. Finally, garnish with Fritos or tortilla chips.

Thursday, October 6, 2011
Southwest Stuffed Acorn Squash

This is one of my go-to favorite fall recipes. I got it out of an Eating Well magazine a long time ago and have adapted it since. The filling can be made ahead of time and refrigerated. Heat it in the microwave for a few minuets right before it's put in the squash.
Ingredients
3 acorn squash
1 lb favorite sausage (turkey, chicken, or pork)
1 red bell pepper
1 small onion
2 cups halved cherry tomatoes
1 clove garlic, pressed or minced
1 tablespoon chili powder
1 tablespoon ground cumin
1 15oz can of black beans, rinsed
Several dashes of hot red pepper sauce, to taste
1 cup dairy free mozzarella cheese (I use Daiya)
Directions
Preheat oven to 375 degrees. Lightly coat a large baking sheet with cooking spray.
Cut the squash in half and scoop out the seeds. Place the squash cut side down on the baking sheet. Bake until tender, about 45 minutes.
Meanwhile, lightly coat a large skillet with a cooking spray and heat over medium heat. Add sausage and cook until lightly browned. Add onion and bell pepper; cook until softened, about 3 to 5 minutes. Stir in garlic, chili powder and cumin. Cook for 30 seconds. Stir in tomatoes, beans, and hot sauce. Cover, reduce heat, and simmer until the tomatoes are broken down, about 10 to 12 minutes.
When the squash are tender, fill the squash halves with the sausage mixture. Top with cheese. Bake until the cheese is melted about 8 to 10 minutes.
Monday, September 12, 2011
Super Fudge Brownies
Who doesn’t love a warm gooey brownie? I found this super easy and equally crave-busting brownie recipe from Silvana Nardone from Cooking for Isaiah. It has become a staple dessert in our house.
Ingredients
1 cup semisweet chocolate chips, melted
1/4 cup unsweetened cocoa powder
1/3 cup vegetable oil
3 tablespoons water
1 cup sugar
2 large eggs, at room temperature
1/2 cup gf flour
1/4 teaspoon salt
Directions
In a medium bowl, whisk together the melted chocolate, cocoa powder, oil and until smooth.
In a large bowl, whisk together the sugar and eggs. Whisk in the chocolate mixture. Fold in the flour and salt just until combined. Transfer into a greased 8-inch pan and spread to the edges. Bake in a 350 degree oven for 28 to 30 minutes, until the edges pull from the pan and the brownie is set.
Let cool in the pan set on a wire rack.
Friday, September 9, 2011
Zucchini Cakes

This is another fabulous way to use up all my zucchini from the garden. The recipe is really easy to make. It works well as a side dish or as a main course, depending on what else you serve it with. I think adding a dash of Tabasco or cayenne pepper to the recipe would be a great way to spice it up. I found it in an Eating Well Magazine a few years ago and adapted it from there.
Ingredients
1 large egg
2/3 cup finely chopped shallots
1 tablespoon chopped flat leaf parsley
1/4 teaspoon salt
1/4 ground pepper
2 cups shredded zucchini (or summer squash)
1/2 cup Parma! Vegan Parmesan
1 tablespoon extra virgin olive oil
Directions
Preheat over to 400 degrees.
Beat egg in a large bowl. Stir in shallots, parsley, salt, and pepper. Place shredded zucchini in the center of a clean kitchen towel; gather up the ends and twist to squeeze out any liquid. (make sure to get it very dry or the cakes won't stick together) Add the zucchini and cheese to the bowl; stir to combine.
Heat oil in a cast iron pan. Pack 1/3 measuring cup with the mixture and squeeze out any extra liquid. Unmold the cup into the pan and gently pat it down to form a 3 inch cake. Repeat making 4 cakes.
Cook until brown and crispy about 4 minutes. Gently turn the cakes over and transfer the pan in the oven. Bake for 10 minutes. Serve immediately.
Tuesday, September 6, 2011
Zucchini Bread

Every time I make this someone asks for the recipe, so here it is. The bread is sweet, moist, and delicious. The zucchini part even makes you feel a bit healthy. I make it every summer to use up the extra zucchini in my garden and freeze the loaves. The recipe came from my mom and I adapted it to make it gluten and dairy free.
Ingredients
3 cups GF flour
1 teaspoon salt
1 teaspoon soda
3 teaspoons cinnamon
1 teaspoon baking powder
3 eggs
2 cups sugar
3 teaspoons vanilla
1 cup oil
3 cups grated zucchini (not peeled)
1-2 cups chocolate chips (optional)
Directions
Preheat oven to 350 degrees.
Sift together the flour, salt, soda, cinnamon, and baking powder. Beat eggs. Add sugar, vanilla and oil to eggs and mix well. Stir in grated zucchini. Add dry ingredients and blend. Stir in chocolate chips. Pour into 2 greased bread loaf pans. Bake for an hour.
Monday, September 5, 2011
Avocado Tomato Brushetta
This brushetta is great for the gluten free because instead of serving it on toasts, you serve it on potatoes! Plus in the summer you can use all the fresh foods from the farmers markets or your garden.
Ingredients
3 large tomatoes, diced
3 medium avocados, diced
2-4 cloves garlic, diced or pressed
3 bunches of basil, sliced into chiffonades
3 jalapenos, finely diced
2 tbsp olive oil
1 tbsp balsamic vinegar
Salt & pepper to taste
4 or 5 large potatoes, sliced into coins ~ 1/4 inch thick
olive oil
Directions
Preheat the oven to 400 degrees.
Combine all ingredients above besides the potatoes. Set aside. You can refrigerate for a few hours if you want to make it ahead of time.
In a bowl, toss the sliced potatoes in a little olive oil. Line a baking sheet with parchment paper and placed sliced potatoes on the sheet. Bake for 15 minutes or until potatoes are tender.
Place the potatoes on a serving tray and top them with the brushetta.
Thursday, August 18, 2011
Chewy Snack Bars
This recipe oringally came from Kraft's Rainforest Chewy bars. I modify it almost every time I make it depending on what nuts and dried fruit I have in the house. They make for great snacks and are easy to take on the go.
Ingredients
1 tablespoons honey
2 tablespoons Earth Balance
3/4 package (10 oz.) marshmallows
4 cups gluten free rice cereal flakes
2 cups gluten free granola
1 cup dried cranberries
1 cup chopped almonds (or your nut of preference)
1/2 cup sunflower kernels
Directions
Microwave honey and Earth Balance in large microwaveable
bowl on HIGH until melted (30 seconds - 1 min). Stir until well blended. Add
marshmallows; toss to coat. Microwave 1-1/2 min or
until marshmallows are puffed; stir until well blended.
Add remaining ingredients and mix well.
Press cereal mixture firmly into greased 13x9-inch
pan. Grease your hands/spoons if it gets too sticky when pressing. Cool and cut into bars.
Tuesday, August 2, 2011
Sesame Peanut Noodle Salad

My sister served this salad at my baby shower and everyone instantly fell in love with it. She found it on Foodnetwork.com and I hardly had to adapt it to be gluten free. This recipe is great as a side or you can make it into a main dish by adding chicken.
Ingredients
1 pound GF spaghetti (I used a mix of rice and corn pasta)
4 tablespoons peanut oil
4 tablespoons creamy peanut butter
4 tablespoons soy sauce
2 teaspoons toasted sesame oil
2 tablespoons light brown sugar
2 teaspoons freshly minced ginger
2+ pinches crushed red pepper flakes
1 cup julienned cucumbers
1/4 cup green onion tops, sliced diagonally
1/4 cup chopped unsalted peanuts
1 tablespoon sesame seeds
Rotisserie chicken, broken into pieces [optional]
Directions
Fill a medium pot with water and bring to a boil over high heat. Add the pasta and boil according to the package directions allowing the pasta to be al dente. Drain the spaghetti in a colander, then transfer noodles to a large mixing bowl. Using tongs, toss with 2 tablespoons of the peanut oil to keep the pasta from sticking. Set aside.
In a medium mixing bowl, whisk together the remaining peanut oil, peanut butter, soy sauce, sesame oil, brown sugar, ginger, and crushed red pepper flakes. Whisk until smooth.
Pour 1/2 of the peanut mixture onto the spaghetti and, using tongs, toss to coat the pasta. Cover the spaghetti with plastic wrap and refrigerate until chilled, about 2 hours.
When ready to serve, pour the remaining peanut mixture onto the spaghetti and toss to coat. Sprinkle with julienned cucumbers, sliced green onions, chicken, chopped peanuts and sesame seeds. Serve immediately.
This recipe also lasts a few days in the fridge as it great served as leftovers. It's best to sprinkle the cucumbers and onions right before serving or they will get soggy.
Note: When I added the chicken I one and a halved the sauce recipe. I tossed the chicken in a little bit of sauce before adding it so it also had a lot of the peanut flavor and stayed moist.
Monday, July 11, 2011
Quinoa Taco Salad

I found this recipe on a blog from an old friend: Eat Drink Pretty. It's delicious as it looks. There wasn't much I had to change to make it gluten and dairy free.
Ingredients
1 cup quinoa, rinsed
1 red pepper, chopped
1 orange/yellow pepper, chopped
Cherry tomatoes, halved
Half a red onion, chopped
Can of black beans, drained
1/4 cup cilantro
1 avocado, chunked
Juice of 1 lime
1 tablespoon cumin
Salsa
Optional - Queso fresco for those that can eat dairy or any DF crumby cheese
Directions
Prepare 1 cup of quinoa as instructed on the package.
Pour the lime juice into a large bowl and mix in the cumin. Add the avocados and toss to coat. Stir in the peppers, onion, tomatoes, and black beans.
Spoon desired amount on quinoa onto a plate and top with the vegetables mix. Top with cilantro, cheese and salsa. Makes about 4-6 a servings.
Note: Quinoa can be served hot or cold with this dish. The first night I ate it hot and the second day I took it as a cold salad for lunch. Both were great!
Wednesday, July 6, 2011
Dairy Free Fruit Dip
Creamy, sweet, cool, and super easy. This dairy free dip is a must try for your next summer BBQ.
Ingredients
1 8 ounce package of Toffuti cream cheese, softened
1 7 ounce jar of marshmallow cream
1 teaspoon of vanilla
1 tablespoon of lemon juice
Directions
Using an electric mixer, blend together the cream cheese and marshmallow cream. Once blended and smooth, add in the vanilla and lemon juice.

Sunday, June 26, 2011
Oatmeal Peanut Butter Chocolate Chip Cookie Bars

Two desserts that I cannot stay away from are cookies and any peanut butter/chocolate combination. Combine all three of those together and I am in heaven. I adapted this recipe from a blog but I have no idea where it was, so sorry my credit is lacking.
Ingredients
2 3/4 cup GF flour
2 1/2 teaspoons baking powder
1/2 teaspoon salt
1 1/2 sticks of Earth Balance, softened
2 cups of light brown sugar
3 eggs
1 teaspoon of vanilla extract
1 1/2 cup of DF chocolate chips
1/2 cup oatmeal
2 big spoonfuls of peanut butter
Directions
Pre-Heat Oven to 350 degrees.
Using a mixer cream butter and sugar. Add eggs, one at a time until mixture becomes creamy. Mix in vanilla extract. Sift in flour, baking powder, and salt. Mix until combine. Stir in chocolate chips, oatmeal, and peanut butter.
Spray a 9X13 pan with cooking spray.
Bake for 40-45 minutes or until top is golden brown. With my oven, after 40 minutes the cookie is a little under baked which is perfect to me. If the top starts to brown too quickly cover with foil and continue to bake.
Thursday, June 23, 2011
Soft Pretzel Sticks
I would be a liar if I said I didn’t miss a mall pretzel drizzled with ooey gooey cheese, so when I stumbled on this recipe for soft pretzel sticks from Valley Natural Foods and I could not wait a single day to make them. Armed with a friend who is also restricted with her diet due to Lyme Disease, we strapped the kids into the van and headed to our local Natural Food store to buy the necessary ingredients. An hour and a half later we were devouring these warm bites of pretzel-breadstick deliciousness.
As you will see the recipe calls for powdered milk. Adapting this recipe to make it dairy free came with much thought as the natural food store we were at did not carry a non-dairy powdered milk substitute. Amanda came up with the great idea to warm almond milk and substitute milk for the 2/3 C water to activate the yeast. By sheer trial and error we tried it and it worked! I will leave the recipe as is, as it should be fairly easy to find a non-dairy powdered milk. However I have added an “optional” list if you are unable to find a substitute for powdered milk.
Ingredients
1 Tbsp. yeast, active dry
2/3 C. water, warm
1/2 tsp. sugar
1/2 C. sorghum flour
1/2 C. tapioca flour
1 Tbsp. milk powder (non-fat dry)
2 tsp. xanthan gum
1/2 tsp. sea salt
1 tsp. onion powder
1 tsp. unflavored gelatin powder
1 Tbsp. olive oil
1 tsp. apple cider vinegar
1 egg white
2 Tbsp. milk
2-3 Tbsp. Kosher or coarse salt
OPTIONAL
Substitute the 2/3 C warm water with warm almond milk
while omitting the milk powder.
DIRECTIONS
Combine yeast, warm water, and sugar in a small bowl, set aside for 5 minutes or until yeast is foamy. In medium mixer bowl, blend flours, dry milk powder, xanthan gum, salt, onion powder, and gelatin powder on low speed. Add yeast mixture, olive oil and vinegar; beat on high speed for 3 minutes.
Place dough in a large, heavy-duty plastic resealable bag that has 1/4” opening cut into one corner (makes 1/2” circle). Squeeze dough through opening onto baking sheet that has been coated with cooking spray. It works best to hold the bag upright as you squeeze the dough out. You may make traditional pretzel shapes, but straight 3” sticks are easiest. Brush lightly with beaten egg white, then sprinkle with coarse salt.
Place pretzels in warm place to rise for 10-15 minutes. Preheat oven to 400°F. Bake until pretzels are dry and golden brown, about 10-13 minutes. When cool, store in airtight container. Makes 2-1/2 dozen pretzel sticks. These are best devoured the day you bake them as they got more and more chewy as the days went on. We agreed that next time we would try to freeze them and only take out and thaw as we needed them.

Wednesday, June 15, 2011
Bob's Red Mill All Purpose GF Baking Flour

I'm not going to put too many bad reviews on here but Kristie and I felt it was necessary. Back when we were first trying the whole GF life, I bought this flour and tried to use it as a substitute for all purpose flour. Every recipe left me with an after taste that I couldn't handle. I find this flavor in many GF mixes. Justin, being so used to eating GF, doesn't notice it but as soon as I taste a recipe that has it, I instantly know. It took me a couple years to finally figure out what it is: bean flours! I read that bean flours are often added to mixes to add protein. This mix contains garbanzo flour and fava flour. Doublely bad in my mind.
I know this mix is convenient, and it can be hard to find other pre-made GF flour mixes. I can't say you should never ever use this. If you have a recipe that only calls for a very small amount of flour, it should be fine. But I would never make a cake or anything that is flour based.
If you have a GF flour mix that you like and works well, I'd love to hear about it!
Thursday, June 9, 2011
Arrowhead Mills Pancake & Baking Mix

Arrowhead Mills is by far the best pancake mix I have found. They have a sweet vanilla flavor and are a bit denser than a gluten full pancake which just makes them more filling. When following the recipe on the back, I have found that the batter is way too thick. I come close to double the amount of milk (I use almond milk) that they recommend to make the batter nice and runny.
Last time we made them we added chunks of bananas and I also added chocolate chips in mine. So delish!!

Saturday, June 4, 2011
Summer Pasta Salad
I am quickly realizing that when searching for a recipe that is gluten free and dairy free starting with a search for a vegan recipe opens my options up to a whole batch of easily adaptable and “safe” recipes. I did just this when looking for ideas for a pasta salad, and came up with a refreshing salad that was easy to adapt to fit not only our diet needs, but also our tastes. This was adapted from a recipe found at VegWeb.com. I added some summer sausage (definitely not a Vegan ingredient) as well as black olives. The great thing about a vegetable pasta salad is your ability to add whatever type of veggies you enjoy. If you increase the amount of vegetables drastically you may want to increase the amount of dressing you make in order to ensure a creamy and great tasting salad.
Ingredients
1 bag (12 oz.) of Tinkiyada Rice Pasta
2 stalks of celery, chopped
1 bell pepper, any color, chopped
1 large cucumber, quartered and then chopped
1 can (8 oz.) of sliced black olives
1 cup of chopped summer sausage
1 cup Italian Dressing
1/4 cup Mayonnaise
1 Tablespoon Dijon Mustard
1 teaspoon Dill Weed
1/2 teaspoon Sea Salt
Fresh cracked pepper to taste
Directions
In a separate small bowl whisk together the Italian Dressing, mayo, Dijon mustard, dill weed, and salt and set aside. Cook the pasta according to package instructions making sure to rinse with cold water when complete and add to a large bowl. Add the chopped vegetables and coat with 1/2 of the dressing mixture. Refrigerate both the salad and dressing mixture overnight. Before serving the salad add the other 1/2 of the dressing tossing to coat evenly.

Wednesday, June 1, 2011
Rhubarb Cake

This time of year I am always looking for different things to make with the abundance of rhubarb from my garden. I tried a rhubarb cake that I adapted from The Rhubarb Compendium. The site is pretty great and has tons of different recipes.
Ingredients
2 cups Rhubarb cut into chunks
1 cup brown sugar
1/2 cup white sugar
1 egg
1/2 cup Earth Balance
1 cup applesauce
1/2 teaspoon salt
1 teaspoon baking soda
1 teaspoon vanilla
2 cups GF flour
Directions
Preheat oven to 375 degrees. Cream sugars and Earth Balance. Add egg, salt and mix. Stir in applesauce, baking soda, vanilla, and flour. Add rhubarb. Pour into a greased 9x13 baking pan. Mix 1/4 cup white sugar and 1 teaspoon cinnamon and sprinkle over the top. Bake for 30 to 35 minutes.
I topped the cake with whipped Richwhip and peaches, but any ripe fruit would go well with it. The cake is very moist and doesn’t need an addition topping but who doesn’t love some whipped cream?!
Saturday, May 28, 2011
Black Bean and Avocado Chopped Salad
Fresh, delicious, versatile, and satisfying. Those four words describe this chopped salad recipe that I got from my friend Jen Sikes. If you make only one recipe from this site, you must try this. I ate this as a fresh salsa dip with tortilla chips, a topper to my hamburger and a side to my turkey tacos. I ate those meals within four days and I never once got sick of the flavor combination. If there are any veggies that you are not a fan of, omit them. Have any veggies laying around or ones you can’t live without in a salad? Chop them up and add it to the bowl. I modified the recipe slightly, omitting the green onions and adding garlic.
Ingredients
2 Tablespoons lemon juice (one small lemon)
1 Tablespoon whole grain mustard
2 Tablespoons Olive Oil
1 can of black beans-drained and rinsed
1 cup fresh or frozen corn, thawed
1 avocado, sliced
1/2 cup diced red pepper
1/2 cup chopped cilantro
1/2 cup diced celery
2 green onions, trimmed and thinly sliced
1 pressed garlic clove
Salt and pepper to taste
Directions
In a separate bowl whisk together the lemon juice and mustard. Blend in olive oil whisking continuously, and set aside. In a separate large bowl add the beans and chopped veggies and gently toss. Pour the dressing over the salad and toss to coat. Enjoy!
Wednesday, May 11, 2011
Stuffing Bread

Ingredients
1 loaf Udis whole grain bread
1 loaf Udis white bread
1/2 cup fresh flat leaf parsley
3 tbsp fresh sage
salt
pepper
Earth Balance
Directions
Spread the Earth Balance on both sides of each bread slice. Put the bread on a baking sheet. Broil the bread until brown and toasted. Repeat until all the bread is toasted. Once the bread has cooled, crumble into desired size pieces. Mix in the parsley and sage. Add salt and pepper to taste. Use in any stuffing recipe.
Friday, May 6, 2011
Whipped Cream
Finding a DF whip cream was quite the challenge - from trying to find substitutes to cook with, to just wanting to enjoy a dollop of whipped cream on a dessert. And I think I found a really good solution for both!
Rich's RichWhip Non-Dairy Topping


Rich's can be found in the frozen section of your grocery store. This was purchased at Bylery's but it looks like they are sold at Cub as well. The trial for this was to see if we could use it for strawberry shortcake. Look at how well it whipped up!


We added a little bit of powdered sugar and vanilla and it was perfect. Even for those of us who can eat dairy, it's still delicious. I haven't tried this product in any other recipes yet, but I think it will be a very good substitution for heavy whipping cream or half and half.
They do make another product called Coffee Rich Creamer. Kristie and I did a test to see if this one would make whipped cream. After almost 15 minutes of using the electric beater and still only seeing bubbles, it was deemed a failure. However this product might also be a good substitute for recipes that call for cream.
Tuesday, April 26, 2011
Artichoke Dip

I never thought we’d be able to recreate a dairy free artichoke dip. This recipe is great and turns out creamy and delicious. I served this for Easter and no one noticed that is was diary free. The picture above is a double batch and was taken before the dip was cooked.
20 ounces canned artichoke hearts, drained
1 clove garlic
3 tablespoons finely chopped red onion
1/2 cup mayonnaise
1/2 cup DF sour cream
2 tablespoons DF Parmesan (I used Parma! Vegan parmesan)
1-1.5 teaspoons lemon juice
pinch of sea salt
pinch of ground pepper
big pinch of red pepper flakes (optional)
1 tablespoon Earth Balance
3 tablespoons sliced almonds
1 tablespoon Earth Balance
3 tablespoons sliced almonds
Directions
Preheat the oven to 375 degrees.
Put the artichokes and garlic in the food processor and pulse until hearts are chopped. Scoop the mixture into a medium sized mixing bowl. Add the rest of the ingredients to the mixture. Mix together until well blended. Spoon into a small baking dish or crock. Set aside.
Microwave the Earth Balance until melted (about 20-30 seconds on high). Add the sliced almonds and stir to coat. Sprinkle the buttered almonds on top of the artichoke dip. Bake in the center of the oven for 25-30 minutes until bubbly around the edges and heated through. Serve with GF crackers or toasted baguettes. Makes about 2 cups of dip.
Note: Kristie tried adding spinach to this dip and it was a big fail. It made the dip watery, which took away from the original creamy texture.
I adapted most of the ingredient amounts of the recipe but the inspiration came from the Gluten-Free Goddess.
Thursday, April 21, 2011
Pizza Crust
This crust is so easy to make, and in its normal form is gluten and dairy free. It comes from my favorite cookbook Cooking for Isaiah by Silvana Nardone. She calls this her “Perfect Pizza Crust” and, as far as GF goes, I would have to agree. One of the key tools that is needed for the success of achieving the crispiest of crusts is a baking stone. They can purchased online for around $30.00.
Ingredients
2 cups GF Flour1 (1/4 ounce) package active dry yeast
1 teaspoon salt
1 teaspoon sugar
2 egg whites, at room temperature and lightly beaten
3/4 cup warm water
2 tablespoons extra virgin olive oil
DirectionsIn a large bowl, whisk together the flour, yeast, salt and sugar. In a separate bowl mix the egg whites, oil and water together. Add to the dry ingredients and mix until the dough forms a ball and pulls away from the sides of the bowl.
Separate the dough into two pieces and place each onto a piece of lightly floured parchment paper.
 Using your floured finger tips or rolling pin, roll the dough flat leaving it about 1/4 inch thick. (I have had the most luck using my finger tips in the beginning to start the flattening process. I then place a piece of waxed paper over the top of the dough and roll the dough flat and round from there.)

Remove the waxed paper, keeping the dough on the parchment , loosely cover with plastic wrap, and let rest for 30-40 minutes. Preheat the oven to 450 degrees. Bake one crust at a time, on the parchment paper and preferably on a baking stone. Bake for about 8 minutes until it is puffy and the bottom is golden brown and crispy. Repeat with the second crust.
You can freeze the baked crust for up to one month. Make sure you prepare your pizza on a thawed, room temperature crust.
Taking the room temperature crust, I loaded it up with my favorite toppings, and placed it in a 425 degree oven for 8-10 minutes.

Ingredients
2 cups GF Flour1 (1/4 ounce) package active dry yeast
1 teaspoon salt
1 teaspoon sugar
2 egg whites, at room temperature and lightly beaten
3/4 cup warm water
2 tablespoons extra virgin olive oil
DirectionsIn a large bowl, whisk together the flour, yeast, salt and sugar. In a separate bowl mix the egg whites, oil and water together. Add to the dry ingredients and mix until the dough forms a ball and pulls away from the sides of the bowl.
Separate the dough into two pieces and place each onto a piece of lightly floured parchment paper.
 Using your floured finger tips or rolling pin, roll the dough flat leaving it about 1/4 inch thick. (I have had the most luck using my finger tips in the beginning to start the flattening process. I then place a piece of waxed paper over the top of the dough and roll the dough flat and round from there.)
Remove the waxed paper, keeping the dough on the parchment , loosely cover with plastic wrap, and let rest for 30-40 minutes. Preheat the oven to 450 degrees. Bake one crust at a time, on the parchment paper and preferably on a baking stone. Bake for about 8 minutes until it is puffy and the bottom is golden brown and crispy. Repeat with the second crust.
You can freeze the baked crust for up to one month. Make sure you prepare your pizza on a thawed, room temperature crust.
Taking the room temperature crust, I loaded it up with my favorite toppings, and placed it in a 425 degree oven for 8-10 minutes.

Sunday, April 17, 2011
Chocolate Frosting

The other day I attempted to make a chocolate cake with chocolate frosting. I wasn’t complete sold on the cake but the frosting was wonderful!! This recipe was given to me by Kristie from her “Cooking for Isaiah” by Silvana Nardone cookbook. I only adapted the amounts.
Ingredients
2 cups DF semisweet chocolate chips
1 cup water
Directions
In a microwaveable bowl combine the chips and water. Microwave on high for 2 minutes or until the chips are melted. Stir until smooth and let cool to room temperature. With a handheld mixer, beat the chocolate mixture on medium-high speed until light and whipped; about 10 minutes.
Note: Beating the chocolate made huge mess of my kitchen. I would make sure to wear an apron and transfer the chocolate to the deepest bowl that you have before mixing.

Tuesday, April 5, 2011
Banana Bread

This recipe came from Kristen and has been in my recipe book since right after Brent and I got married. It is a classic, very easy banana bread that leaves the house smelling wonderful. I made a few changes to the recipe, only to make it gluten and dairy free.
Ingredients
1/2 cup Earth Balance butter
3/4 cup white sugar
1 Large egg
2 cups GF flour
1 tsp. baking soda
1/2 tsp. salt
1 cup mashed ripe bananas (about 2 large bananas)
optional: 1/2 cup DF chocolate chips or nuts
Directions
Cream the butter and sugar together. Add the egg and beat thoroughly. Add the dry ingredients, mixing well. Stir in the bananas and finally the chocolate chips and/or nuts. Pour into a greased loaf pan and bake at 350 degrees for 50-60 minutes. When a knife placed in the center of the loaf comes out clean the bread is done.
Side note: I have made this recipe as a loaf, regular muffins, mini muffins, and as pictured above, a 9X9 pan and all have turned out golden brown on top and moist in the middle. The muffins usually bake for about 15-17 minutes and the 9X9 baked for the full 60 minutes.
Thursday, March 31, 2011
Dairy Free Chocolate
It was really scary to take the DF plunge knowing I would have to get rid of chocolate. Besides the whole angry intestinal fight we would have, chocolate and I got along really well pre-DF diet and I wasn’t sure I was going to find a substitute that came close to the real thing.
I was proven wrong after taste testing a bunch of different brands. My absolute favorite is Chocolate Dream Dairy Free Chocolate Bars.
Beyond the great flavor the texture of this chocolate is smooth and creamy. The taste is most definitely chocolaty, but does not try to mimic the flavor of the well known dairy-full chocolate bars like Hershey's or Cadbury. Chocolate Dream is exactly what I need as an after dinner treat…just a couple of bites and my craving is fed.

Not far behind the question of What kind of chocolate bars can I eat, was What kind of chocolate chips can I use for DF baking? This question was first simply answered by using Enjoy Life Dairy Free Chocolate Chips. They are usually sold at any Natural Food Store as well as the Gluten Free section of your local Cub Foods.
A friend of mine, who is also a Vegan, informed me that Ghirardelli Semi-Sweet Chocolate Chips are safe for a vegan and DF diet. These chocolate chips are found at most grocery stores, are a cheaper alternative to Enjoy Life, and have since become my number one go-to chocolate chip.
Monday, March 28, 2011
Sausage Breakfast Cups
(Image courtesy of Allrecipes.com)

I think the first rule for hosting a party is don't try out a new recipe. I usually follow that, but for my sister's baby shower all rules went out the window. I was serving brunch and wanted to make something that was unique, cute, and easy. I found a recipe for sausage and cheese breakfast cups and adapted it to my liking. This recipe makes 12 cups.
Ingredients
8 oz pork sausage
10 large eggs
1 green bell pepper, chopped
1 red bell pepper, chopped
3 scallions, sliced
optional: 1/2 - 1 cup shredded DF cheese
Directions
Preheat the oven to 350 degrees. Fill muffin tin with liners or spray with a non-stick cooking spray.
In a medium skillet cook the sausage until brown and crumbly. Remove the sausage from the pan and sauté the peppers in the leftover sausage grease. Set aside and let cool slightly.
In a large bowl, whisk the eggs. Add the peppers, scallions, cheese and sausage to the eggs and stir. Spoon/pour mixture into muffin cups, dividing evenly. (I put my mixture in a pitcher and poured that way.)
Bake for 25 minutes or until the egg is set.
Note: The sausage made the tops a little greasy and appeared to be not thoroughly cooked, so be sure to use a knife to test if the egg is set. Once the knife comes out clean they are done.
Friday, March 25, 2011
Sweet and Creamy Pumpkin Dip

This recipe I got from a friend of my mom’s a few years ago and have since adapted it to be DF. It’s more of a fall recipe but I love anything with pumpkin in it and eat it year round. The dip is meant to be served with soft ginger snap cookies such as Mi-Del Gluten Free Ginger Snaps. It’s also great for dipping apples and pears.
Ingredients
8 oz DF cream cheese, softened
2 cups powdered sugar
1 can (15 oz) Libby’s pumpkin (other brands actually give the dip a different consistency)
1 tablespoon pumpkin pie spice
1/2 teaspoon ground ginger
Directions
Blend cream cheese and sugar until smooth in a mixer or food processor.

Add remaining ingredients. Mix or blend thoroughly.

Chill 30 minutes or until ready to serve. Serve with gingersnaps, apples, or pears.
Wednesday, March 23, 2011
Gluten Free Beer Bread
Needing one last appetizer for an upcoming party at the Eid's, Kristen and I pondered whether I could make a successful loaf of GF beer bread. The consensus was, we would never know unless I tried. I originally got hooked on Beer Bread from the Tastefully Simple parties that I had been to in years past. A few months ago, without a box of Tastefully Simple on hand, I googled the recipe and found out that it is not only very easy, but also much cheaper to make your own loaf of beer bread. I loaded the recipe, Beer Bread I, from Allrecipes.com and started making my notes for tweaking the recipe to fit our diet restrictions. The original recipe calls for self-rising flour. Because our GF flour is not self rising I did some research and found that it is also very easy, requiring only 2 ingredients, to make our flour self-rising.
Ingredients
3 cups GF Flour
1 Tablespoon plus 1 teaspoon baking powder
1 1/2 teaspoons salt
3 Tablespoons white sugar
1 (12 oz) can or bottle of Gluten Free beer. I used RedBridge
2 Tablespoons Earth Balance, melted
1 teaspoon garlic salt
Directions
In a large bowl whisk the flour, baking powder and salt together. Add the sugar, whisking again. Slowly add the beer and stir together until the dough pulls away from the sides of the bowl. Pour into a greased 9 X 5 loaf pan and let rest for 30 minutes. After resting, bake for 50-60 minutes in a 350 degree oven. Half way through the baking time pour the melted butter and garlic salt over the top of the bread and continue baking until a knife placed in the middle of the loaf comes out clean. Cool completely on a wire rack.
The loaf tasted delicious it was very moist and not a bit grainy. The butter on top was a great crunchy finish to the bread. However, it looked a lot different than the orignal beer bread. It did not have the vibrant golden color when it was finished. I forgot to post a picture of the loaf before I cut it up into chunks to be served. Halfway through the night I realized and took a picture of what hadn't yet been devoured.

Thursday, March 17, 2011
Waffle Bread

Below is her recipe for Waffle Bread. I modified the recipe a bit by using our gluten-free flour blend instead of her all-purpose gf blend. I also scaled back the measurements in fear of making enough waffles to feed an army. This is a savory variation on the classic waffle. There are two things I love about this recipe; first the texture and the warmth coming off the waffle iron make this bread a great alternative to other gf toasted slices of bread. It is crispy on the outside and warm and soft on the inside. I also love that this recipe makes many more waffles than our family of four needed in one sitting, so I was able to freeze a second batch of cooked waffles. In the days beyond making the waffles and freezing them, I would take one or two out of the freezer, pop it in my toaster, and enjoy them all over again.
Ingredients
2 cups gf flour blend
1/8 cup sugar
3/4 Tablespoon baking powder
1 1/2 teaspoons salt
1/2 cup drained and chopped oil-packed sun-dried tomatoes
2 large eggs, at room temperature, lightly beaten
1/4 cup vegetable oil
1 1/2 cups rice milk (I used almond milk)
Italian seasoning blend
Directions
In a large bowl, whisk together the dry ingredients and sun-dried tomatoes. In a small bowl, whisk together the eggs, oil and milk. Add the dry ingredients to the wet and stir until just combined.
Preheat a waffle iron to medium-high heat. Grease the waffle iron with nonstick cooking spray. Pour about 1/3 cup batter onto each waffle iron square, spreading the batter out to the edges and sprinkle with the Italian seasoning blend. Close and cook until crisp, about 5 minutes; let cool and repeat with remaining batter.
I used this waffle bread to make amazingly delicious chicken sandwiches. I spread chipotle mayo on each of the waffle slices, in between the waffles I piled a grilled chicken breast on top of a slice of tomato and two slices of bacon. Yummy!!
Tuesday, March 15, 2011
Cream of Chicken Soup
Justin and I were craving a hearty, homemade Minnesotan meal. I don’t think it gets any more Minnesotan than your classic tatertot hotdish. Super easy to make and stick to your ribs. The problem? I have never seen a DF cream of chicken/mushroom/celery/potato soup. I figured it couldn’t be to hard to make your own, so I did some investigating online and came up with my own version.
Ingredients
1/3 cup Earth Balance
1/3 cup GF flour
1 14oz can of chicken stock
1/4 cup water (or milk substitute)
salt
pepper
optional: canned chicken, mushrooms, potatoes, or celery
Directions
Melt butter in a saucepan. Add the flour, salt, and pepper (to taste). Wisk together. (Makes a roux)

Slowly add the chicken stock and water. Wisk until boiling and mixture has thickened.

This gives you a great base for any cream soup replacement. I didn’t add any of the optional ingredients but it’d be easy enough to do to get your desired soup. Note: This recipe makes more than a 10 oz can of soup so be sure to measure if your recipe requires specific amounts.
Saturday, March 12, 2011
Udi’s Gluten Free Foods
I was really apprehensive to take the gluten free plunge for the sheer fear of not being able to find a bread that tasted, for lack of a better word, normal. Kristen was the first one to recommend Udi’s sandwich bread. Knowing Justin liked it, I figured I would give it a try. One toasted slice later, I was hooked. The texture, when toasted, is almost identical to a toasted piece of wheat bread. When not toasted the bread does have a slightly grainy texture, but it is nothing a little peanut butter and jelly can’t mask.

The Udi’s product line also contains pizza crust, bagels, muffins, cinnamon rolls and granola. All of which are gf and df. I waited to write this review until I tried the muffins that were in my freezer along with the granola that I just recently purchased. All of the Udi’s products have been really really good.
The muffins, which come in blueberry, double chocolate and lemon streusel (the only flavor I have not tried), are really tasty. The flavors are not intense, but the muffins are really moist and they have a true muffin taste. Your taste buds may even trick you into thinking you are eating a cupcake.

The granola is outstanding. I have only tried the vanilla flavor and it was sweet and crunchy—just like granola should be. I love granola with a little bit of almond milk for a bedtime snack…yumm!

The bagel almost tastes more like a toasted bun than a bagel. It is not chewy and does not have a true bagel taste. However, I had a chicken and bacon sandwich on a toasted Udi’s Bagel and it was delish. I think I will try a grilled turkey burger on a toasted bagel next time.

Because I have found a bread product that I not only tolerate, but I enjoy, I have not steered very far away from Udi’s to try other products. If you are eating gf and you have an outstanding bread product please please share your joy with me. I may just go to the ends of the earth if someone can recommend a gf artisan loaf of bread…
All pictures on this post are courtesy of Udi’s Gluten Free Foods
Thursday, March 10, 2011
Pumpkin Muffins
I got this recipe from my sister-in-law Molly who received it from a friend a few years ago. The recipe was already given in GF format as well as a version made with all purpose flour. I tweeked a few things to make it an easily accessible GF recipe. I made mini muffins and froze the majority of them. They are just as delicious defrosted from the freezer as they were fresh from the oven.
Ingredients
3 cups GF Flour
2 teaspoons baking soda
1 teaspoon baking powder
1 1/2 cups brown sugar
1 teaspoon cinnamon
1/2 teaspoon salt
1/4 teaspoon cloves
1/4 teaspoon nutmeg
1 tablespoon Flaxseed
3 eggs
2/3 cup canola oil
1 (15 ounce) can of pumpkin
Directions
In a large bowl combine all of the dry ingredients and whisk together. In a separate small bowl add the eggs, oil and pumpkin and whisk until the eggs are slightly beaten and the ingredients are well blended. Combine the wet ingredients to the dry and stir just until all ingredients are wet.
Bake in a 350 degree oven for 10-12 minutes or until slightly golden brown. This recipe yields 60 mini muffins.
Tuesday, March 8, 2011
DF Cream Cheese
Cream cheese seems to be a staple when it comes to dips and appetizers. There are various versions of DF cream cheeses out there but I think Kristie summed it up best with, "They all taste over-processed and like plastic." I'm sure if you are away from dairy long enough you can convince yourself that it's close to the real thing. Since I have the fortune of still eating dairy I am so.not.there. The consistency of DF cream cheese is very close to the real thing. I have discovered that if your dish is flavorful enough, you can disguise the taste and it turns out great!
The brand that we prefer is Vegan Gourmet Cream Cheese Alternative.

Image courtesy of followyourheart.com
Tofutti also makes their own version of Better Than Cream Cheese which is more widely available (at Cub versus a natural foods store). Both brands are close to the same.
I'll post some of our favorite recipes using DF cream cheese soon!
Sunday, March 6, 2011
Layered Taco Dip
This is a really easy and great tasting family taco dip recipe that has been modified only slightly to make it taste great dairy free and gluten free.
Ingredients
1 can of refried beans
2/3 cup of mayonnaise
1 cup Tofutti Better Than Sour Cream
2 Tablespoons All Recipes Taco Seasoning
16 ounces guacamole. A wonderful df/gf guac is Wholly Guacamole
1 small can of green chilies (optional)
1 small can of chopped black olives (optional)
1 tomato, chopped
Directions
Using an ungreased 9X13 pan spread the refried the beans on the bottom of the pan. In a separate bowl combine the mayonnaise, Tofutti sour cream, and taco seasoning. Once blended, spread this mixture on top of the beans. If you want to add the chilies sprinkle those on top of the seasoning mixture. Next take the guacamole and spread on top of the seasoning mixture. Finish by adding the black olives and the tomatoes to the top. Serve with tortilla chips!
Side note: I have made this for a party that I knew would have dairy free and dairy lovers at. In order to please everyone, I added shredded cheese to 1/2 of the top of the dip.
Thursday, March 3, 2011
Puppy Chow/Muddy Buddies
It isn’t a trip the Sandy Lake, a weekend away, or a girls’ night without a big batch of Puppy Chow. This recipe is adapted from the General Mills recipe for Muddy Buddies to make it DF.
Ingredients
4 cups Rice Chex Cereal
4 cups Corn Chex Cereal
1 cup Enjoy Life Chocolate chips or Ghirardelli Semi Sweet Chocolate Chips
1/2 cup peanut butter
1/4 cup Earth Balance
1 teaspoon vanilla
1 1/2 cups powdered sugar
Directions
Measure cereal, pour into a large bowl and set aside.
In 1-quart microwavable bowl, microwave chocolate chips, peanut butter and butter uncovered on High 1 minute; stir. Microwave about 30 seconds longer or until mixture can be stirred smooth. Stir in vanilla. Pour mixture over cereal, stirring until evenly coated. Pour into 2-gallon resealable food-storage plastic bag.
Add powdered sugar. Seal bag; shake until well coated. Spread on waxed paper to cool. Store in airtight container in refrigerator.
Monday, February 28, 2011
Taco Seasoning
You'd think something as simple as taco seasoning wouldn't contain gluten or dairy. Unfortunately this is not the case and many contain one or both. Luckily it's easy to make your own and it tastes even better.
This recipe is straight from Allrecipes.com: Taco Seasoning I. I make a big batch of this, store it in a air tight container, and I I always have fresh taco seasoning on hand.
Ingredients
1 tablespoon chili powder
1/4 teaspoon garlic powder
1/4 teaspoon onion powder
1/4 teaspoon crushed red pepper flakes
1/4 teaspoon dried oregano
1/2 teaspoon paprika
1 1/2 teaspoons ground cumin
1 teaspoon sea salt
1 teaspoon black pepper
Directions
In a small bowl, mix together chili powder, garlic powder, onion powder, red pepper flakes, oregano, paprika, cumin, salt and pepper.
Sunday, February 27, 2011
Thai Peanut Butter Chicken
The slower cooker has become a staple appliance in our house. Mostly due to the cookbook Make It Fast, Cook It Slow. I love being able to quickly throw some ingredients in the cooker before work and come home to a delicious meal.
This week we tried a Thai peanut style dish adapted from A Year of Slow Cooking. Justin and I both really liked the dish but decided we needed to up the spiciness and add a little more texture.
Ingredients
1 1/2 pounds boneless, skinless chicken, cut in chunks
1/2 cup peanut butter (I used creamy this time but I think chunky would be even better)
1 red bell pepper, seeded and thickly sliced
1 large onion, coarsely chopped
1 can bamboo shoots (optional)
1 tablespoon ground cumin
1 lime, juiced
4 teaspoons red pepper flakes
1/4 cup gluten free soy sauce (I used La Choy)
1/2 cup chicken broth
Directions
Use a 4-quart slow cooker. Put the chicken into the bottom of your pot and add the peanut butter. Toss in the vegetables, cumin, and red pepper flakes. Squeeze in lime, add the soy sauce and chicken broth. Stir as well as you can to combine (the peanut butter will be clumpy). Cover and cook on low for 6-8 hours, or on high for about 4 hours.
After cooking it looked like this

Serve over rice or quinoa. We actually served over quinoa noodles. It made the dish very hearty and filling. It was good, but I think it would be better over the rice/quinoa because they would soak up the juices more than the noodles did.

Saturday, February 26, 2011
Ancient Harvest Quinoa Noodles
I stumbled across these noodles at Cub one day and I was excited to try another type of gluten free pasta. These are delicious. They plump when you boil them and there texture is very very similar to that of a flour pasta noodle.
Quinoa contains more protein than any other grain; an average of 16.2 percent, compared with 7.5 percent for rice, 9.9 percent for millet, and 14 percent for wheat. Some varieties of quinoa are more than 20 percent protein. Sited from Quinoa.net
Another perk about these noodles is the boiling time. A typical rice pasta noodle can take up to 18 minutes to cook to an al dente texture. These Quinoa noodles only take about 9-10 minutes!

Picture courtesy of Quinoa.net
We have tried linguine, elbow, and the spiral variety. All have been a success! You can find them at Cub foods in the gluten free/organic section as well as any local natural food store.
Wednesday, February 23, 2011
Chocolate Peanut Butter Cups
The title of this recipe should be “Bite Size Taste of Heaven” because that is exactly these taste like. They are a take on the popular Reese Peanut Butter Cups. Who doesn’t love a pb cup?? I received this recipe from my friend Jen Sikes, an amazing vegan and GF baker. I made just a few changes to her recipe and below is the recipe.
Ingredients
1/2 cup Earth Balance
3/4 cup crunchy peanut butter (preferably unsweetened and unsalted)
3/4 cup graham cracker crumbs. I had great luck with Kinnikinnick brand: S’moreables
1/4 brown sugar
1 cup chocolate chips. I used Enjoy Life’s DF chocolate chips
1/4 cup almond milk
1/4 cup chopped peanuts, pecans or almonds
Directions
You can use either a 12-cup regular muffin pan or a mini muffin pan. I used the mini’s and it worked great. Whichever you use, line the tins with paper liners and set aside.
Melt the butter in a small saucepan over medium heat. Stir in the peanut butter, graham cracker crumbs and brown sugar, mix well. Remove mixture from the heat. Evenly divide mixture, approximately 1/2 to 1 Tablespoon per cup among the muffin cups. Chill for 30 minutes before proceeding to the next step.
Combine the chocolate and milk in another pan. Stir over medium heat until the chocolate has melted. Spoon the chocolate evenly over the peanut butter mixture. Chill for another 30 minutes.
Top with chopped nuts. Place in the refrigerator for at least 2 hours before serving to let them set. The hardest part of this entire recipe is the 2 hours you have to wait while these delicious bites set. Mmmmm
**A GREAT side note: Jen confirmed that Ghirardelli semisweet chocolate chips are DF, as well as vegan! This is a cheaper route than having to buy the Enjoy Life brand of DF chocolate chips.
Sunday, February 20, 2011
Chex Mix
Who doesn’t love home made Chex Mix? It is one of my very favorite snacks and it does not last long when I make a batch of it. Mikayla LOVES this snack and would eat it as an entire meal if I let her.
There are thousands of variations of the very popular snack mix that General Mills made popular many years ago. This family recipe is an adapted version of the recipe off the side of the cereal box that I have changed to make not only Gluten Free but also Dairy Free.
Ingredients
6 Tablespoons Earth Balance, melted
5 teaspoons Worcestershire Sauce
1 teaspoon salt
1/2 teaspoon garlic powder
3 Cups Corn Chex
3 Cups Rice Chex
2 Cups Gluten Free Cheerios
1 Cup Gluten Free Pretzels
1/2 Cup chopped peanuts
Directions
Pre-heat your oven to 250 degrees.
In a glass measuring cup, whisk the melted butter, Worcestershire sauce, salt, and garlic powder and set aside.
In a large roasting pan add the Chex cereal, pretzels and peanuts and stir to mix. WAIT to add the cheerios until later. Pour the liquid seasoning over the dry ingredients and stir to coat the cereal evenly. Now you can add the cheerios and stir those to coat as well. (I wait to add the cheerios because they tend to fall to the bottom of the pan, soak up the liquid and shrink and shrivel when cooked.)
Cook the mix for one hour, stirring and shaking table salt over the mixture, every 15 minutes.
Subscribe to:
Posts (Atom)